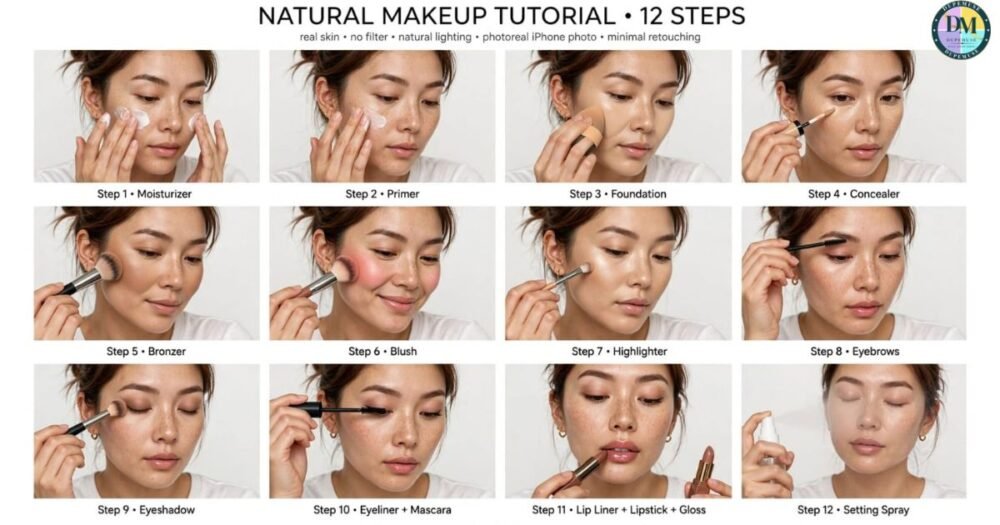
Learning how to apply makeup step by step with pictures is easy when you follow the right order. This beginner-friendly makeup tutorial shows you how to apply foundation, concealer, blush, eyeshadow, mascara, and lipstick with simple makeup techniques.
You’ll learn the correct makeup routine, how to blend each product, and how to create a natural makeup look. Whether you’re applying makeup for the first time or improving your skills, these easy steps will help you get a polished result without feeling overwhelmed.
What You Need Before Applying Makeup

Before starting how to apply makeup step by step from 0 with pictures, gather your basic makeup products first. You don’t need an expensive collection. A beginner can start with moisturizer, sunscreen, makeup primer, foundation, concealer, setting powder, blush, bronzer, brow product, eyeshadow, eyeliner, mascara, and a lip product.
Your tools matter too. A few clean makeup brushes, a makeup sponge, a mirror, and cotton swabs can handle most tasks. If you have acne-prone skin, choose suitable beauty products and avoid sharing makeup or applicators. AAD also recommends cleaning makeup brushes regularly. AAmerican Academy of Dermatology
| Item | Main job |
|---|---|
| Moisturizer | Hydrates skin |
| Sunscreen | Helps protect skin from UV exposure |
| Primer | Helps prepare the surface |
| Foundation | Evens the appearance of skin |
| Concealer | Adds targeted coverage |
| Powder | Helps reduce shine |
| Bronzer | Adds warmth |
| Blush | Adds cheek color |
| Highlighter | Adds light-reflecting glow |
| Brow product | Defines brows |
| Eyeshadow | Adds color and depth |
| Eyeliner | Defines the lash line |
| Mascara | Defines lashes |
| Lip product | Adds color and shape |
| Setting spray | Helps finish the routine |
Step 1: Apply Moisturizer and Sunscreen
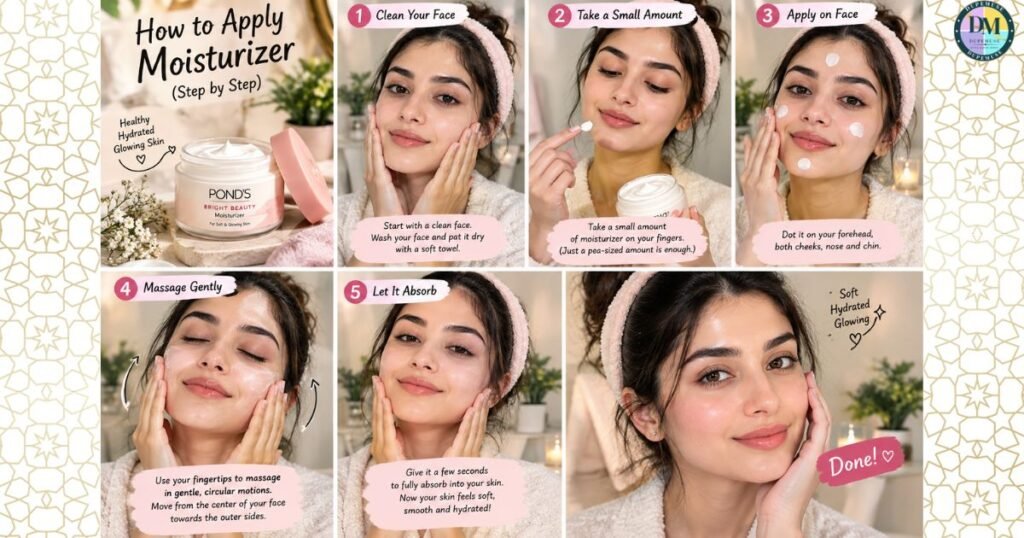
Good makeup application starts before makeup. Begin with clean skin and apply moisturizer suited to your skin type. Give it a moment to settle. Then apply broad-spectrum sunscreen with SPF 30 or higher when you’re getting ready during the day. This creates a comfortable base without treating makeup as a substitute for skincare.
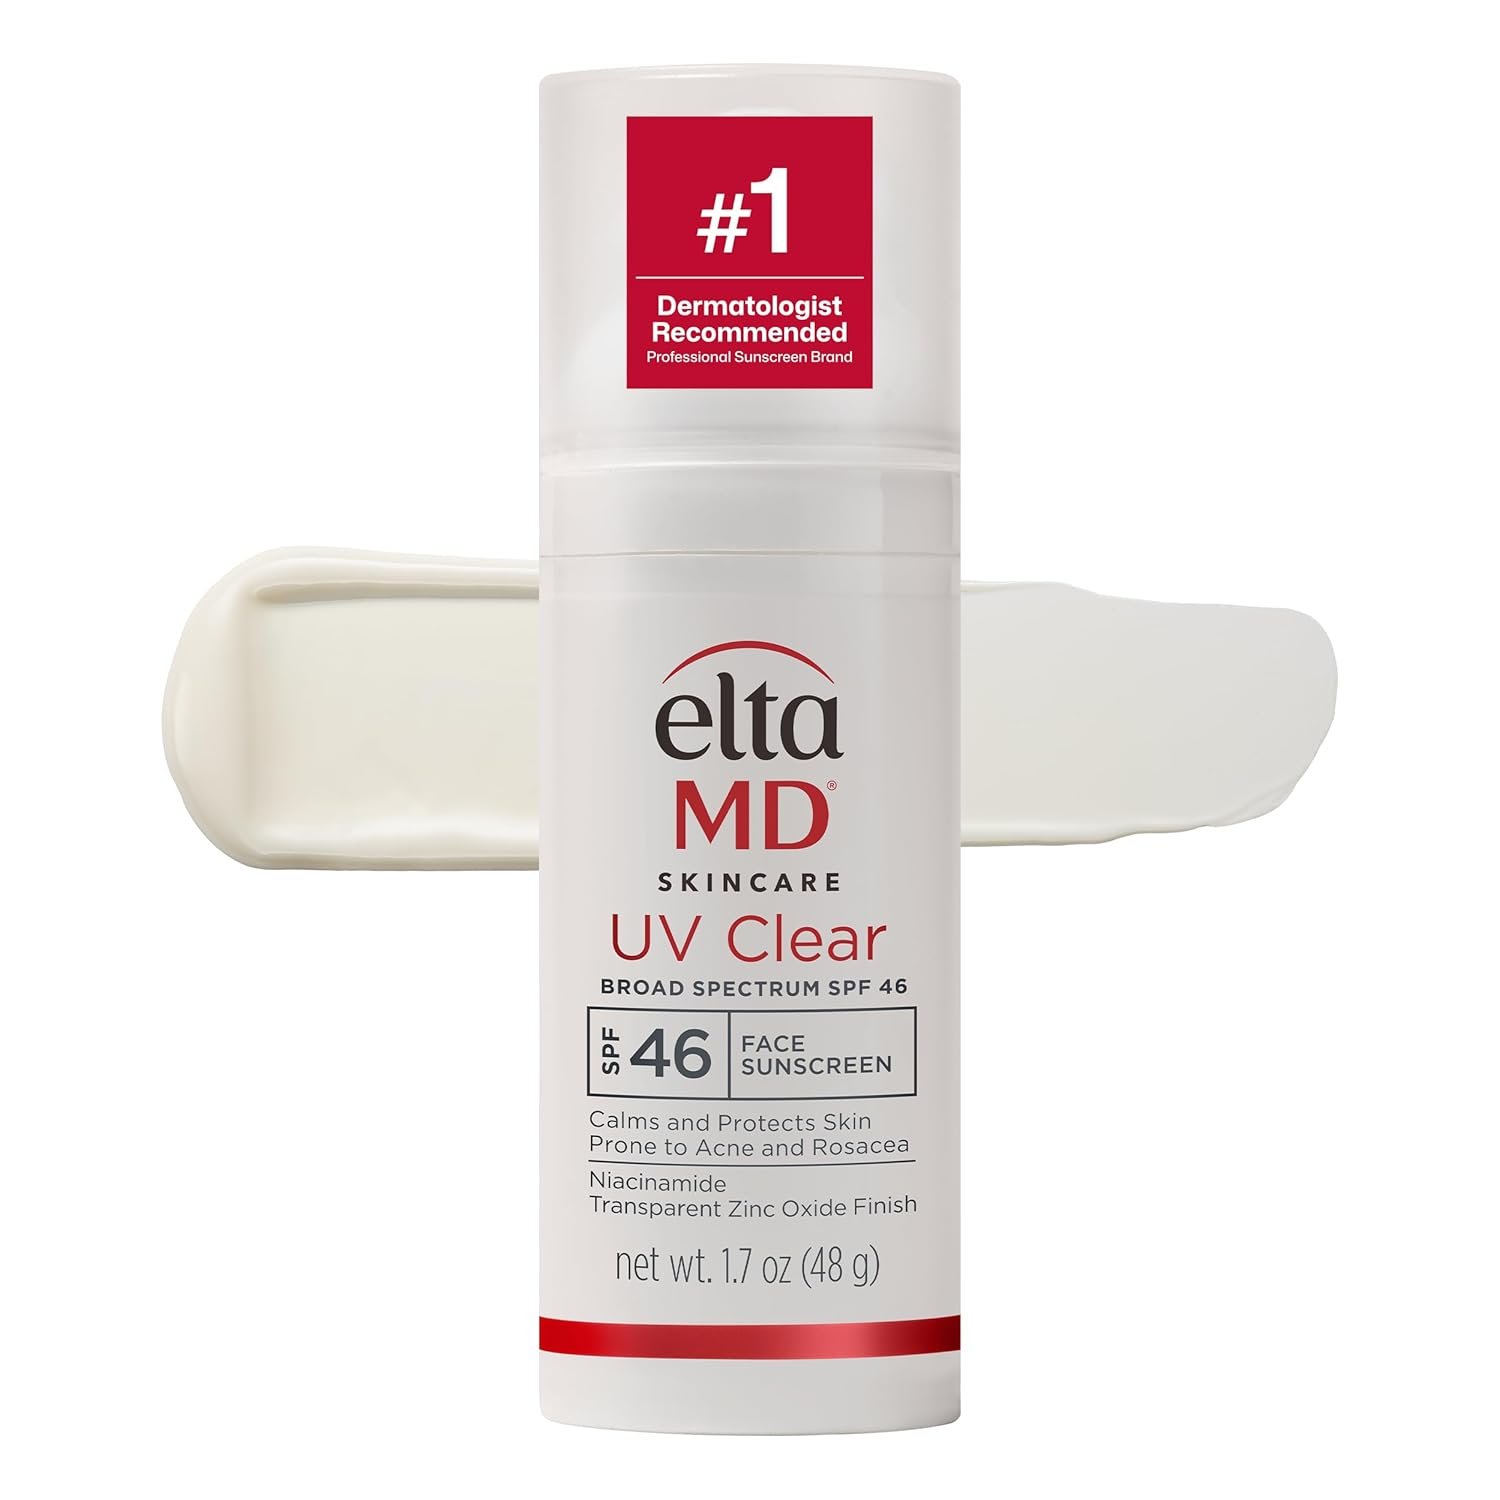
Sunscreen should sit beneath your makeup. AAD specifically recommends applying sunscreen after other skincare and before makeup when you’ll be outdoors during daylight. AAmerican Academy of Dermatology If your skin feels dry after moisturizing, don’t pile on more makeup. Let your skincare do its job first.
 |
Step 2: Apply Primer
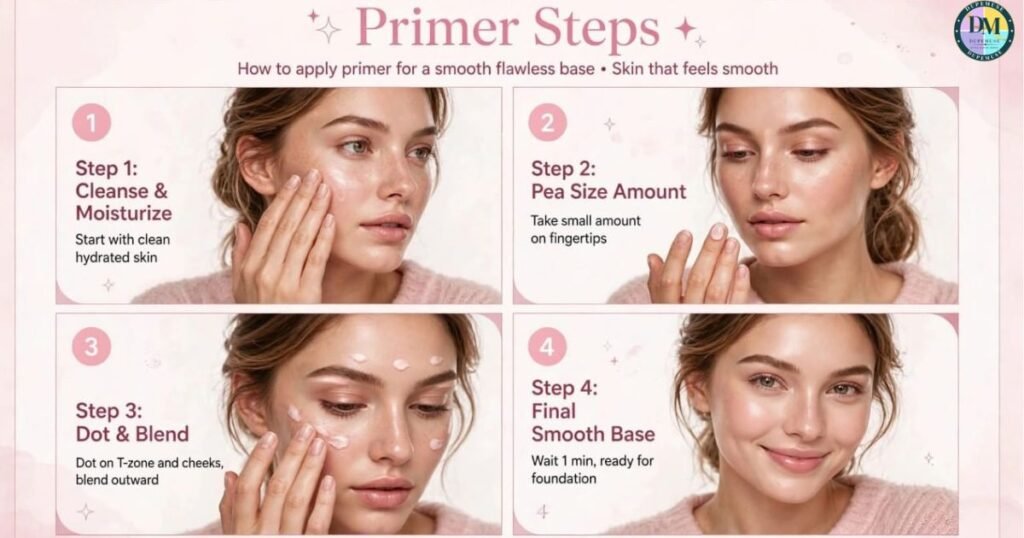
Next, apply primer to the face if primer suits your skin and desired finish. Primer can help create a smoother-feeling surface before foundation. Some formulas focus on hydration while others target shine or the appearance of pores. You don’t necessarily need a separate primer every day.
Start with a pea-sized amount of primer. Press or gently spread it over areas where foundation tends to move, crease, or emphasize texture. Too much primer can make products slide or pill. In other words, primer should support your base rather than become another thick layer.
Step 3: Apply Foundation
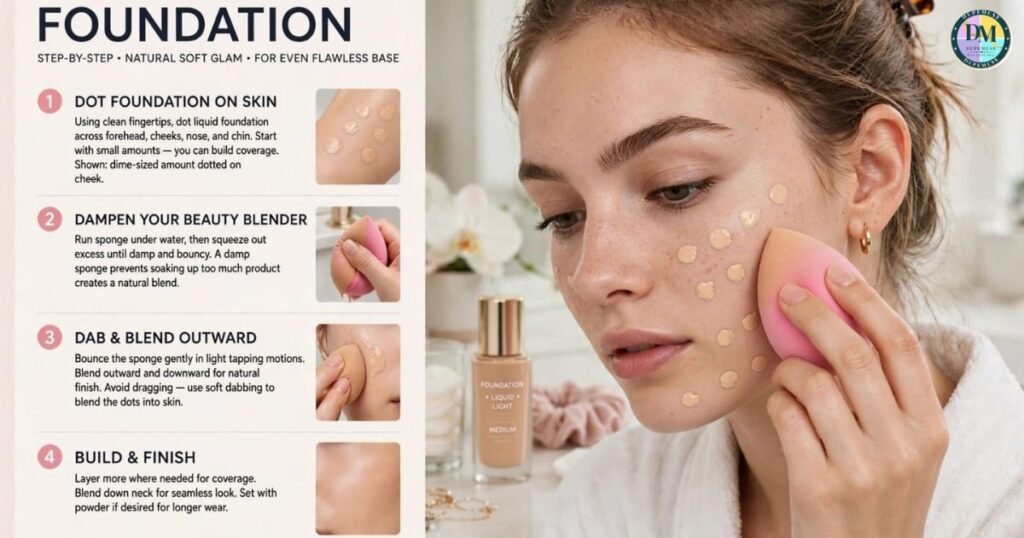
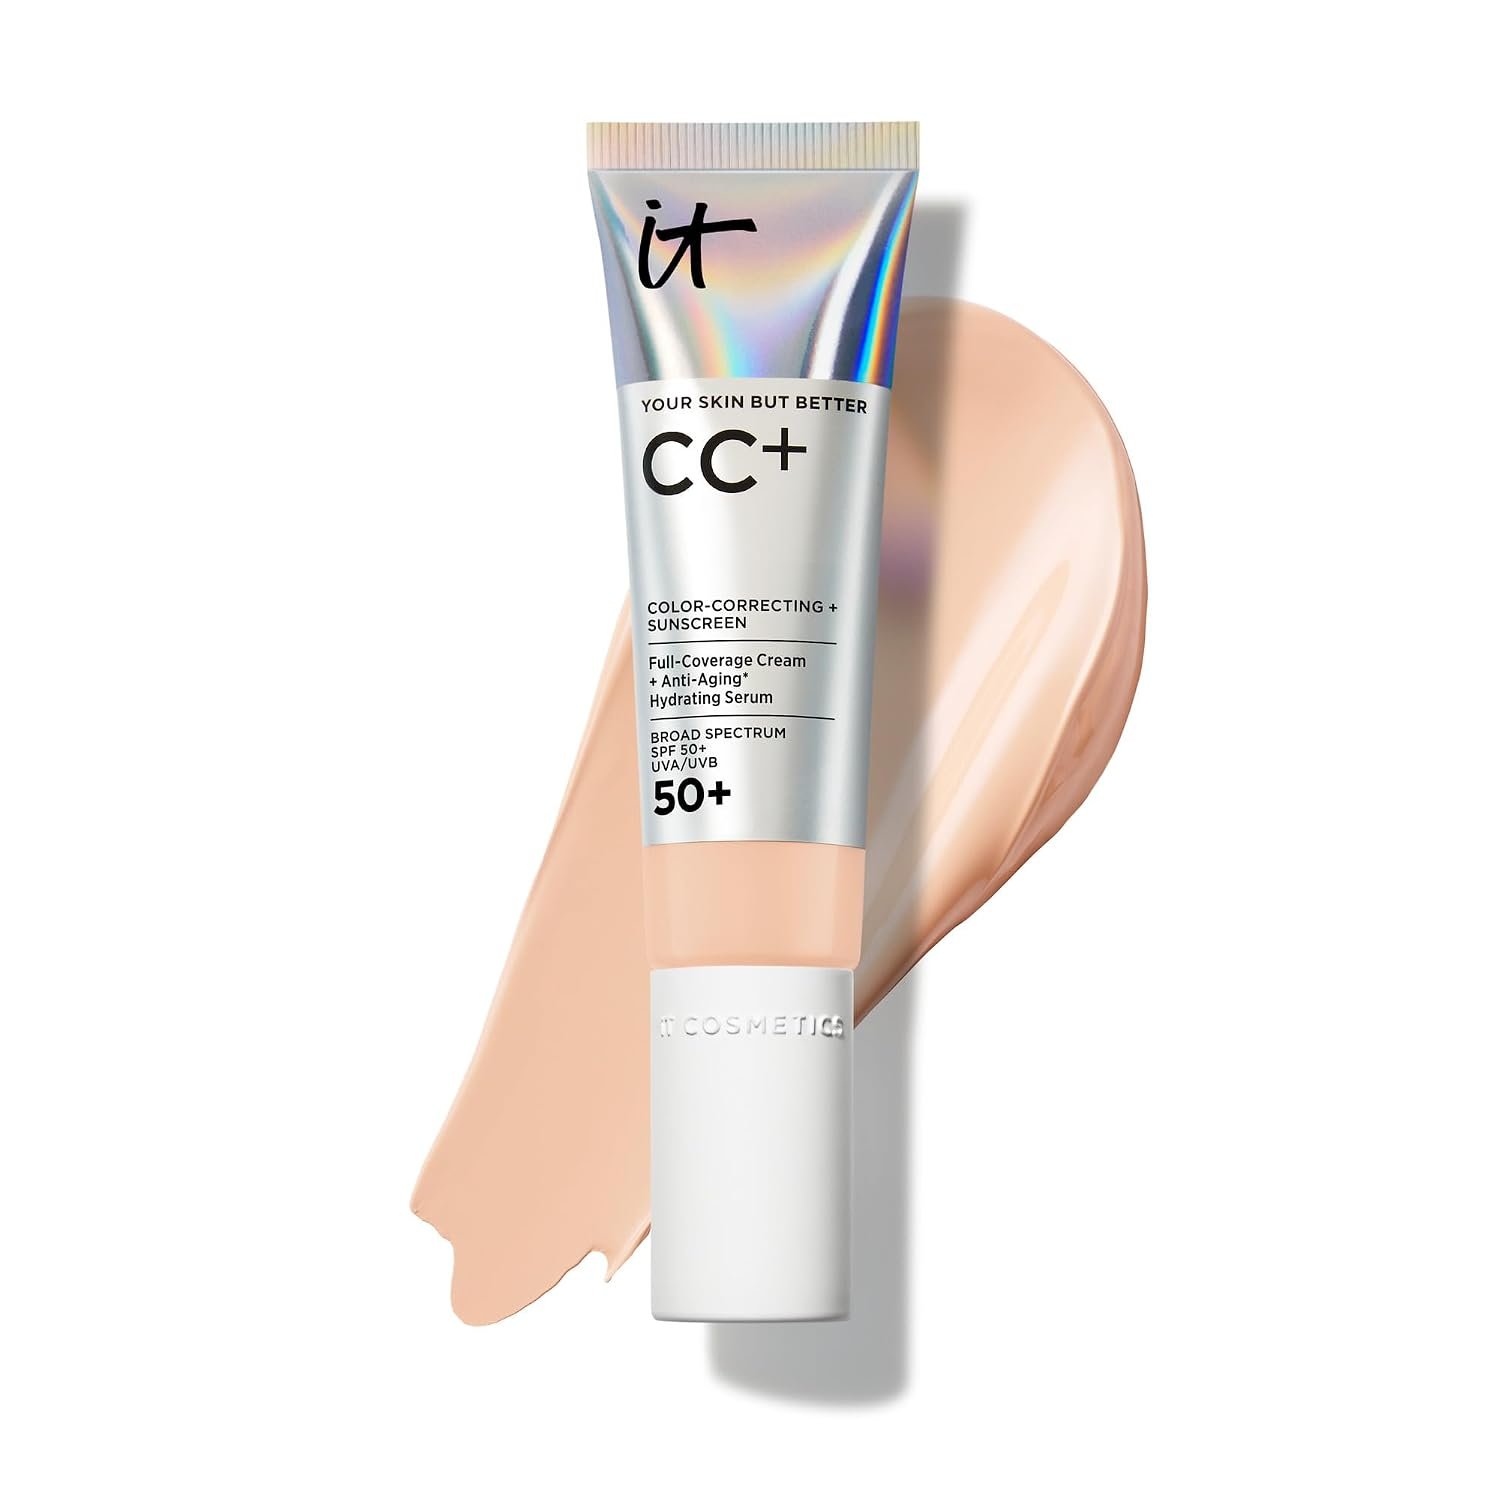
Foundation creates an even-looking canvas for the rest of your face makeup. When learning how to apply foundation correctly, begin with a small amount around the center of your face. Then work outward toward the cheeks, jaw, and hairline. Thin layers usually look more natural than one heavy coat.
For liquid foundation application, place small dots or short strokes where you need coverage. You can blend foundation with a brush or use a damp makeup sponge. Move gently across the skin instead of repeatedly rubbing one area. Always check the jawline in natural light because indoor lighting can hide a poor shade match.
The goal isn’t to erase every pore. Real skin has texture. Your foundation should make your complexion look more even while still allowing it to resemble skin.
For more detailed guide : How to Apply Foundation: Brush, Fingers or Sponge? – DupeMuse
 |
Step 4: Apply Concealer
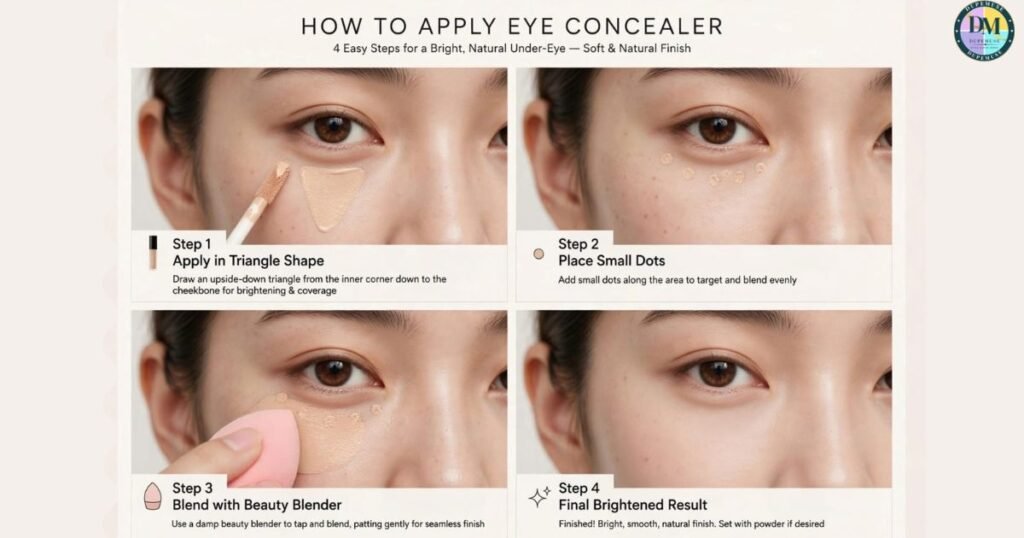
Concealer gives you more targeted coverage than foundation. Use it under the eyes, around the nose, over redness, or on individual blemishes when needed. A small amount usually works better than a thick layer because excess product can gather in fine lines.
Apply concealer after foundation in most beginner routines. Then gently tap it into place using a small brush, sponge, or clean fingertip. Don’t drag the product across the skin. This simple approach makes makeup blending easier and helps preserve the base underneath.
For more detailed guide : How to Apply Concealer for a Flawless Base – DupeMuse
Step 5: Apply Setting Powder
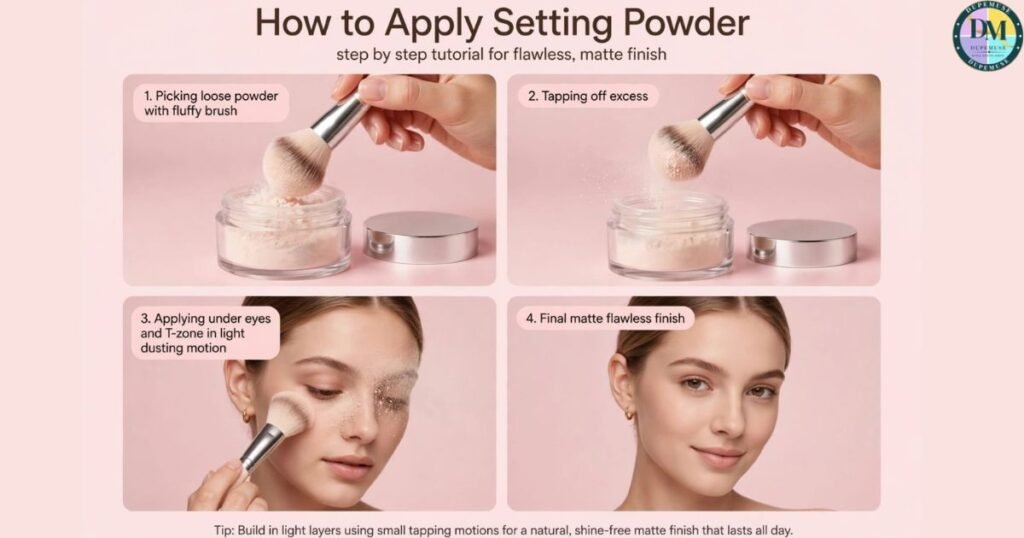
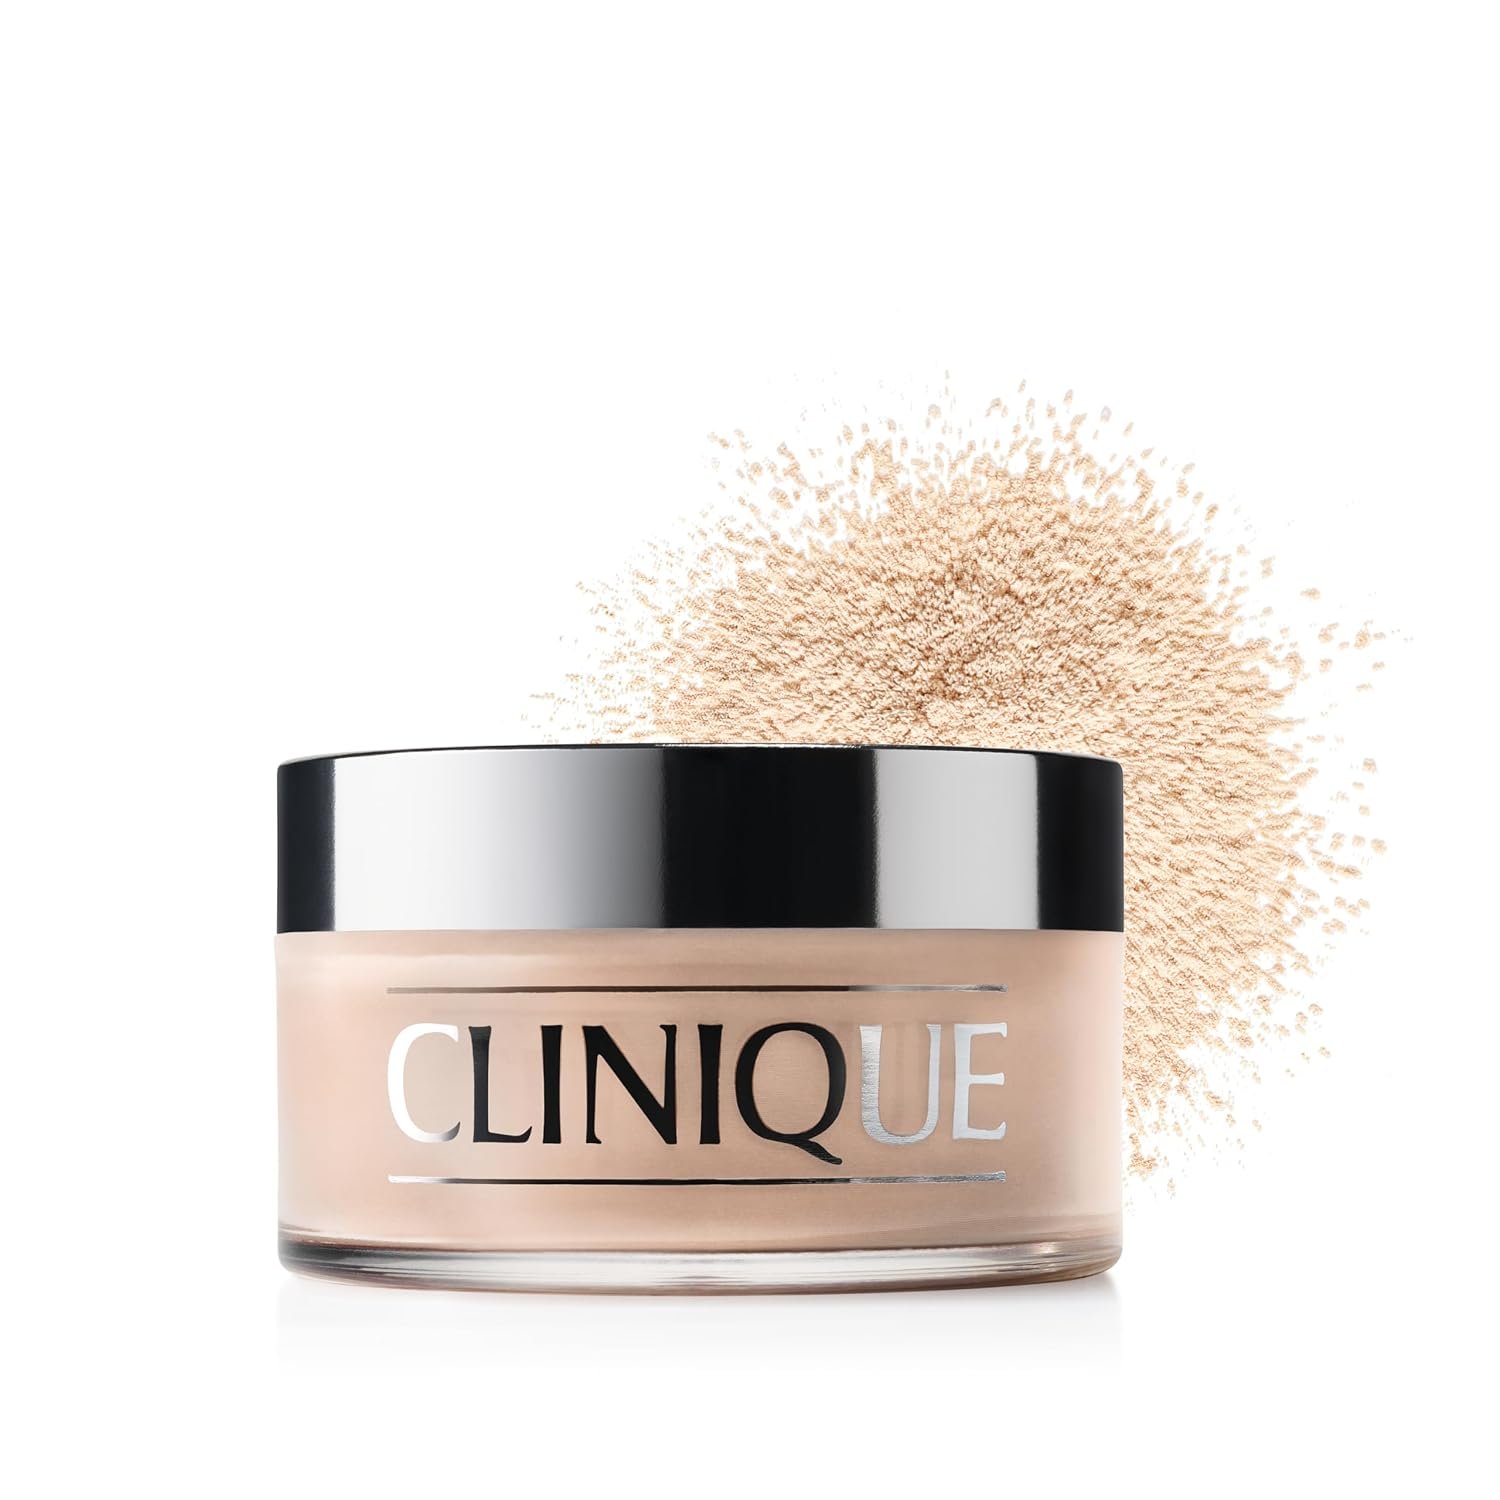
Now use setting powder where you want less shine or more stability. The forehead, sides of the nose, chin, and under-eye area often need more control than the cheeks. You don’t have to powder every inch of your face. Leaving some areas less powdered can create a fresher finish.
Use a fluffy brush or powder puff and apply a thin layer. If you set foundation with powder too heavily, your complexion may look dry or flat. For oily skin, strategic powder can help. For dry skin, use less and concentrate on areas that actually need it.
 |
Step 6: Apply Bronzer and Blush
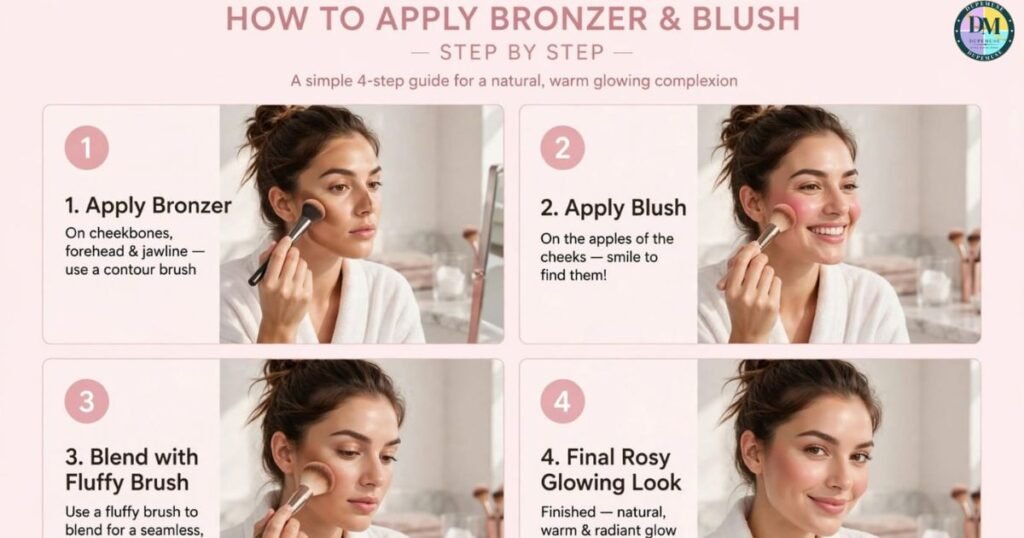
This is where your complexion starts looking warmer and more dimensional. Bronzer adds warmth while blush adds visible cheek color. They aren’t interchangeable. Good makeup techniques use both products lightly and build intensity slowly.
Cream products usually work best before powder products with a similar purpose. However, formulas vary. Follow the product directions and avoid layering too many thick textures. The aim is a soft transition, not obvious stripes across the face.
How to Apply Bronzer
When learning how to contour your face, first understand that bronzer and contour aren’t exactly the same. Bronzer generally adds warmth. Contour creates the appearance of deeper shadows. For everyday makeup, place bronzer around the forehead, upper cheeks, and jawline with a light hand.
If you’re practicing how to contour your face with makeup, use a cooler-toned contour product where you want a shadow effect. You can contour cheekbones and jawline while you apply contour to temples. Keep the edges soft. Then blend makeup with circular strokes until you can’t see a distinct border.
How to Apply Blush
Blush brings life back to the complexion after foundation and powder. Smile naturally if that helps you locate the cheeks, then place a modest amount on the fuller cheek area. Blend toward the temples for a lifted-looking effect. Cream blush can create a fresh finish while powder blush often gives more buildable intensity.
Your ideal placement can change with your face shape and the look you want. Don’t treat every viral technique as a rule. Makeup is adjustable. Start lightly, step back from the mirror, and add more only if needed.
Step 7: Apply Highlighter
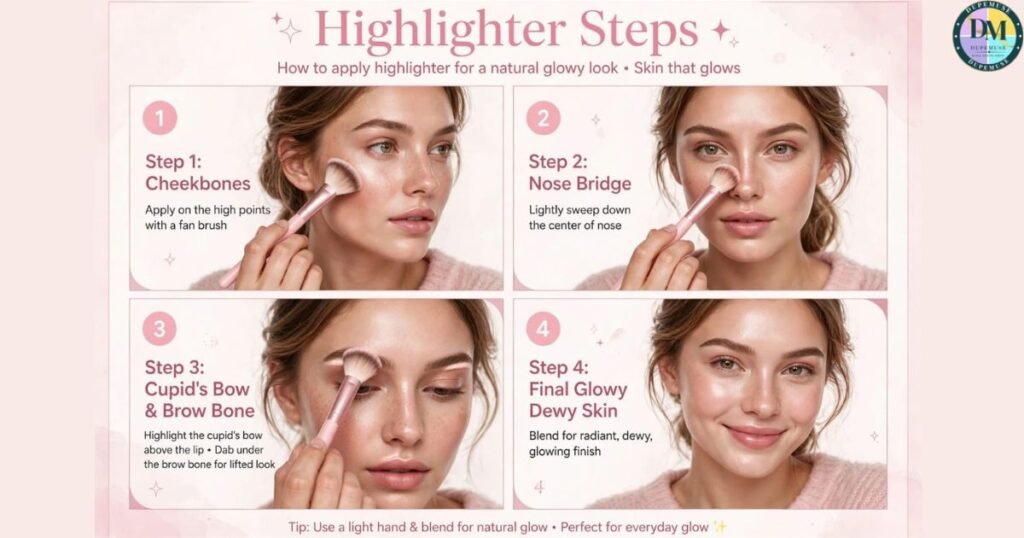
Highlighter works by reflecting light from selected areas. To learn how to use highlighter on your face, start with the tops of your cheekbones. You can also use a small amount above the lip, on the brow area, or at the inner corners of the eyes.
For a softer daytime result, choose a fine-textured product rather than large glitter particles. A shimmery highlighter can look beautiful when used sparingly. To apply highlighter to cheekbones, tap it onto the highest point and blend the edges so the glow fades naturally.
Step 8: Do Your Eyebrows
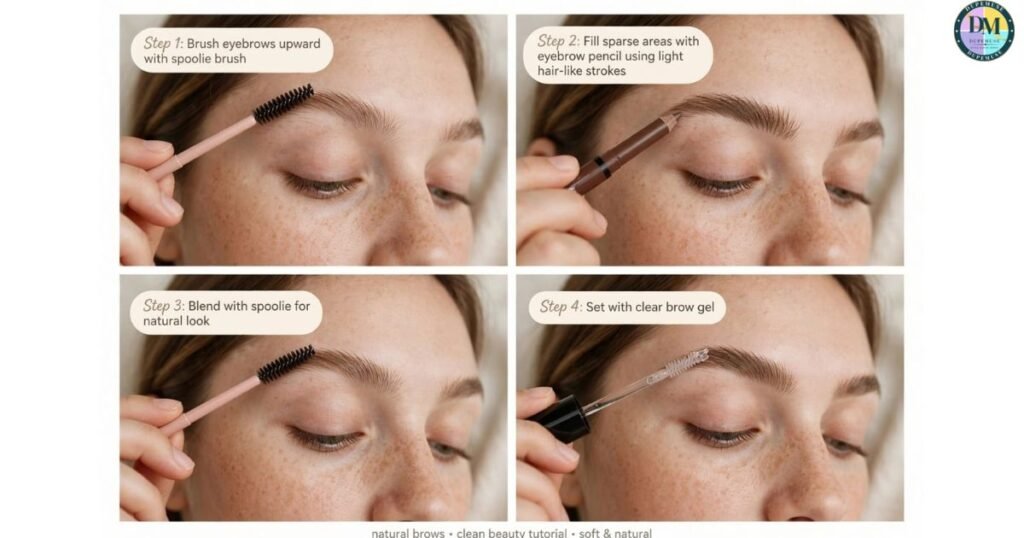
Brows frame the eyes, so small changes can alter your entire makeup look. Start by brushing the hairs upward. Then define eyebrow shape without drawing a completely new brow. Your natural structure gives you a useful starting point.
To learn how to shape and fill eyebrows, identify the eyebrow starting point, eyebrow arch, and eyebrow tail. Use short strokes to fill in eyebrows where hairs look sparse. Avoid making the front of the brow too dark. A softer front usually looks more natural.
A brow pencil works well for beginners because you can create small hair-like strokes. Brow powder creates softer definition. Gel can hold the hairs in place. Your choice depends on the amount of structure and fullness you want.
Step 9: Apply Eyeshadow
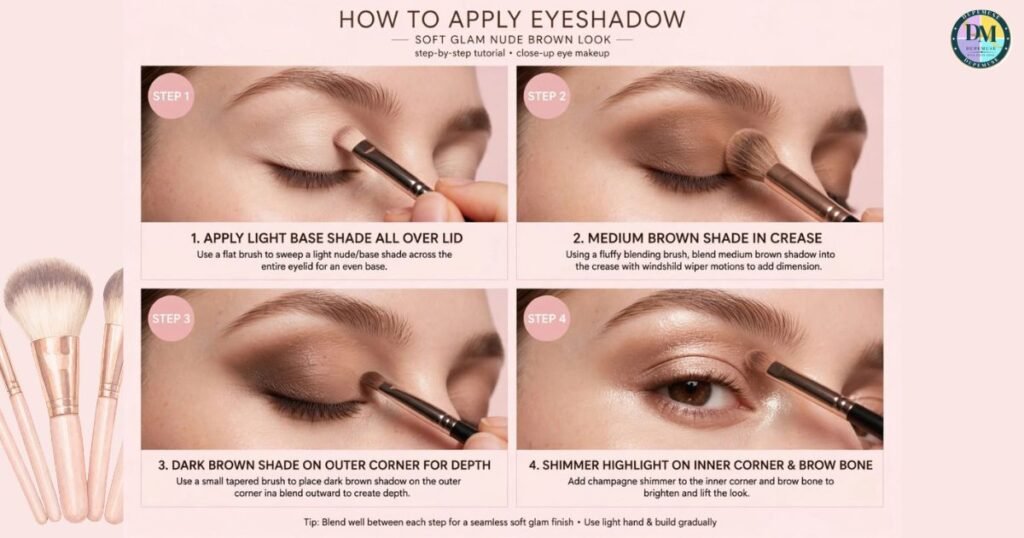
A simple eye look doesn’t require an enormous palette. Begin with a light eyeshadow, add a mid-tone eyeshadow through the crease, and use a dark eyeshadow sparingly for depth. This three-level approach makes learning how to apply eyeshadow much easier.
For a simple look, apply eyeshadow to outer V and gently blend eyeshadow into crease. Then use a lighter shade near the center or inner lid if you want more contrast. Good eyeshadow blending matters more than owning expensive shadows.
How to Create a Simple Eyeshadow Look
For an easy daytime result, sweep a neutral mid-tone through the crease. Add a slightly deeper shade to the outer corner and outer V. Use a clean blending brush to soften harsh edges. If you want more brightness, highlight inner corner of eye with a light shade.
For more definition, you can apply eyeshadow under eyes using the same mid-tone shade. Keep the lower line thin and soft. The secret is gradual layering. It is much easier to add color than to remove too much.
Step 10: Apply Eyeliner and Mascara
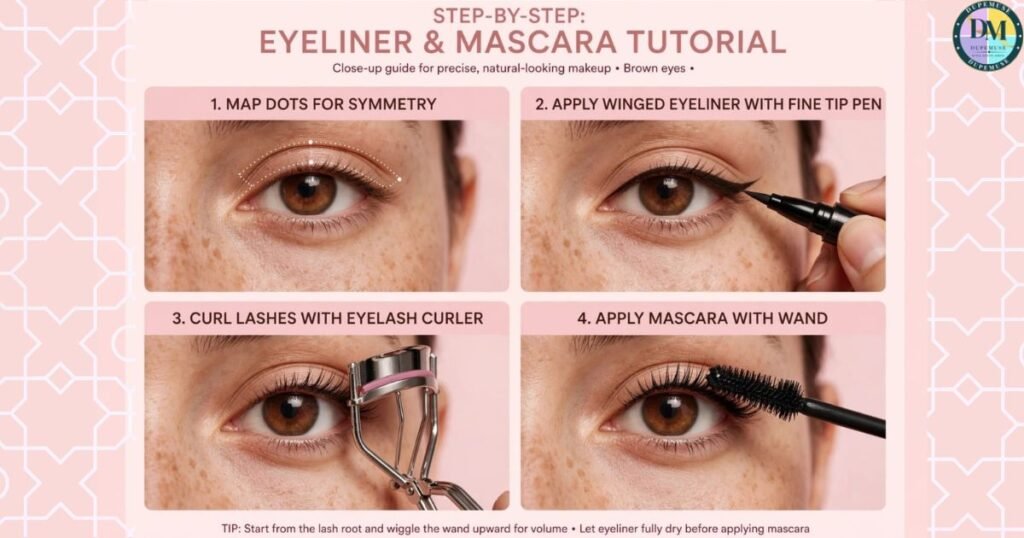
Eye definition can completely change a beginner’s routine. Start with a pencil if liquid liner feels difficult. Work close to the upper lashes and keep the line thin. As your hand becomes steadier, you can experiment with different shapes and finishes.
Mascara comes afterward. It darkens and separates the lashes while helping the eyes look more awake. Always use products intended for the eye area. FDA advises washing your hands, avoiding shared eye cosmetics, and replacing old mascara according to manufacturer guidance. UU.S. Food and Drug Administration+1
How to Apply Eyeliner
The easiest eyeliner application technique is to work in small sections. Rest your elbow on a stable surface if that helps steady your hand. Instead of attempting one perfect stroke, connect short strokes along the lash line.
Once comfortable, practice classic winged eyeliner. Extend the outer line slightly upward, then connect it back toward the lash line. Learning how to apply winged eyeliner takes repetition. If your lines don’t match at first, that’s normal. Even experienced artists make adjustments.
Avoid using products around the eyes unless they’re specifically intended for that area. FDA notes that cosmetics should be used according to their intended purpose and warns against using unsuitable products near the eyes. UU.S. Food and Drug Administration
How to Apply Mascara
Before applying mascara, wipe excess product from the wand if it looks overloaded. Then apply mascara from root to tip using gentle upward movements. Wiggle the wand slightly at the base before moving toward the ends. This helps distribute the product rather than depositing one thick blob.
If you’re learning how to apply mascara without smudging, allow the first coat to settle before adding another. Avoid pumping the wand repeatedly because powder textures can change the order. For example, applying a wet cream product over heavily powdered skin may disturb the base. The better rule is to understand texture, then skipping blending, choosing a poor shade match, or rushing. A thick foundation layer can make skin look heavier.
Dark brow fronts can make the products suited to your skin type. Apply thin layers and allow each layer to settle before adding another. Strategic powder can help areas that become shiny an entire collection. A foundation or skin tint, concealer, blush, brow product, mascara, and lip color can create that can push more air into the tube. Never add water or saliva to dried mascara. FDA specifically warns against doing so because it can introduce bacteria. UU.S. Food and Drug Administration
Step 11: Apply Lip Liner, Lipstick, or Lip Gloss
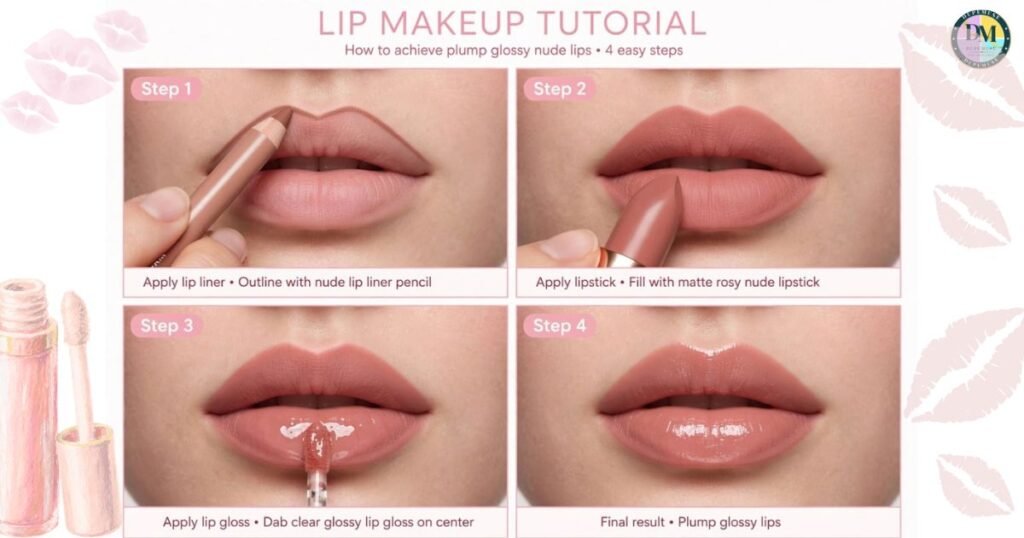
Lips are often the easiest place to personalize your look. You can use liner alone, lipstick alone, or both together. For a soft daytime look, choose a shade close to your natural lip color. For evenings, richer colors can create more contrast.
If you’re learning how to apply matte lipstick, prep dry lips first. Then use liner to define the natural edge. For liquid matte lipstick application, start with a thin layer and let it dry according to the product instructions. The lip makeup technique should remain controlled rather than heavily layered.
 |
How to Apply Matte Lipstick
To practice how to apply matte lipstick, first make sure the lips aren’t covered with excess balm. Lightly outline the natural lip shape, then fill the center. With liquid formulas, you can outline lips with lipstick wand before filling the rest.
A matte lipstick can look polished, while a liquid lipstick often offers stronger wear. Gloss creates a different effect and can soften a very matte finish. If the color spreads beyond your natural lip line, clean the edge with a tiny amount of concealer.
Step 12: Set Your Makeup
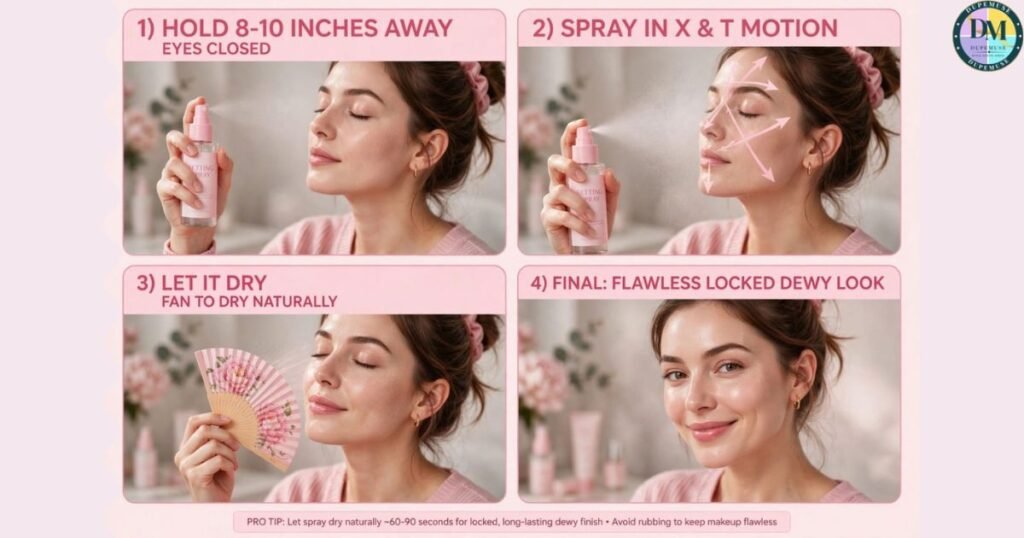
The final step helps bring the entire complete makeup routine together. A setting spray can reduce the powdery appearance left by several layers and may help improve wear. Hold the bottle according to its instructions and mist evenly across the face.
If you’re learning how to make makeup last longer, remember that setting spray isn’t magic. Long wear begins with suitable skincare, compatible formulas, thin layers, and sensible powder placement. Heat, humidity, skin type, and touching your face can all affect how long your makeup stays fresh.
What Is the Correct Order of Makeup Application?
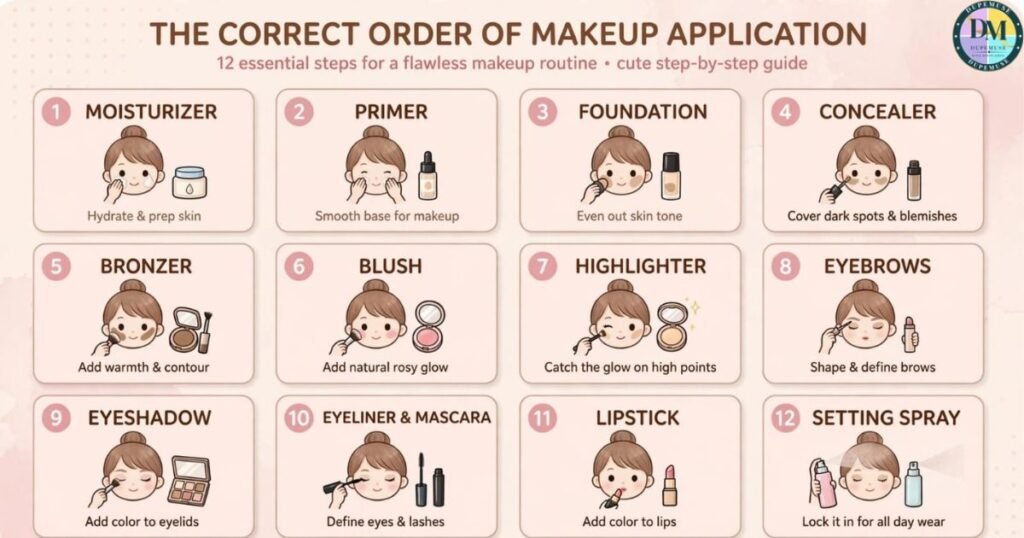
The basic order for makeup application starts with skincare and moves from complexion products toward color and finishing products. A simple sequence is moisturizer, sunscreen, primer, foundation, concealer, powder, bronzer, blush, highlighter, brows, eyeshadow, eyeliner, mascara, lip products, and setting spray.
There isn’t one universal rule for every product. Cream and powder textures can change the order. For example, applying a wet cream product over heavily powdered skin may disturb the base. The better rule is to understand texture, then keep your layers thin and blendable.
| Stage | Makeup step | Main purpose |
|---|---|---|
| 1 | Moisturizer | Hydrate |
| 2 | Sunscreen | Protect exposed skin |
| 3 | Primer | Prepare the base |
| 4 | Foundation | Even complexion |
| 5 | Concealer | Target coverage |
| 6 | Setting powder | Control shine |
| 7 | Bronzer | Add warmth |
| 8 | Blush | Add cheek color |
| 9 | Highlighter | Add glow |
| 10 | Eyebrows | Frame the eyes |
| 11 | Eyeshadow | Add eye color |
| 12 | Eyeliner | Define eyes |
| 13 | Mascara | Define lashes |
| 14 | Lip products | Finish the lips |
| 15 | Setting spray | Finish the look |
Common Makeup Mistakes Beginners Should Avoid
Most beginner problems don’t come from using the wrong expensive product. They come from using too much, skipping blending, choosing a poor shade match, or rushing. A thick foundation layer can make skin look heavier. Dark brow fronts can make the face look harsher. Too much powder can remove the natural dimension of the skin.
Another common mistake is copying a technique without considering your own face. Contouring, blush, brows, and eyeliner all depend on your features and the result you want. Also remember basic hygiene. FDA recommends keeping eye cosmetics clean, not sharing them, and replacing old eye products. UU.S. Food and Drug Administration+1
| Common mistake | Better approach |
|---|---|
| Too much foundation | Build thin layers |
| Wrong foundation shade | Check the jaw in natural light |
| Harsh contour | Use less product and blend longer |
| Heavy powder | Powder only where needed |
| Dark brow fronts | Use lighter, hair-like strokes |
| Thick eyeliner | Start close to the lash line |
| Clumpy mascara | Remove excess from the wand |
| Overdrawn lips | Follow the natural lip border |
| Dirty brushes | Clean them regularly |
| Shared eye makeup | Keep eye products personal |
Frequently Asked Questions
These questions cover the parts of makeup for beginners that usually cause the most confusion. Once you understand the purpose of each layer, the routine becomes much less intimidating. You don’t need to memorize every trend. You need a repeatable process that works for your skin and your preferred style.
Your finished result can also change with the occasion. Natural makeup may need only a few lightweight layers. Bridal makeup, photoshoot makeup, and makeup for special occasions often use stronger definition because lighting and photography can reduce visible contrast.
What is the correct order to apply makeup?
The basic order is skincare, sunscreen, primer, foundation, concealer, powder, bronzer, blush, highlighter, brows, eyeshadow, eyeliner, mascara, lip products, and setting spray. This gives you a reliable starting point for a complete face.
However, makeup artists may change the sequence for specific techniques. Some prefer doing eyes before complexion to catch fallout. Others use cream products differently. Focus on thin layers and avoid placing a wet product over a layer that you don’t want disturbed.
Should I apply concealer before or after foundation?
For most beginners, apply foundation first and concealer afterward. Foundation may already cover some redness or discoloration. That means you can use less concealer and keep the finished base lighter.
There are exceptions. Color correctors often go beneath foundation because they address a specific color concern. The important part is restraint. Concealer should target areas that still need attention instead of becoming a second foundation layer.
How to put on makeup step by step for beginners?
Start with moisturizer, sunscreen, primer, foundation, and concealer. Then add powder, blush, brows, eyeshadow, mascara, and lip color.
How to apply makeup for seniors?
Use hydrating skincare, lightweight foundation, cream blush, and soft eye makeup. Avoid heavy powder because it can emphasize dry skin and fine lines.
What is the 3:1:1 rule for makeup?
The 3:1:1 rule is a simple guideline that typically means using three parts complexion products, one part cheek color, and one part eye or lip emphasis. However, its meaning can vary between makeup creators.
What is the best way to apply makeup step-by-step?
Apply products from skincare to complexion, then cheeks, eyes, and lips. Blend each layer well and build coverage gradually for a smooth, natural finish.
How do I make my makeup look natural?
The easiest route to natural makeup is using less product and blending carefully. Choose a foundation that matches your complexion, apply it mainly where you need it, and avoid covering areas that already look even.
Natural-looking makeup isn’t necessarily makeup-free makeup. It means the transitions are difficult to detect. Your foundation, blush, bronzer, and concealer should gradually fade into your skin rather than stop in visible lines.
How can I make my makeup last all day?
Start with clean, comfortable skin and use products suited to your skin type. Apply thin layers and allow each layer to settle before adding another. Strategic powder can help areas that become shiny, while setting spray can provide the final finish.
Your environment matters too. Hot weather, humidity, exercise, and frequent face touching can shorten wear. For long-lasting makeup, carry a small powder or blotting product if you need a midday refresh rather than repeatedly adding foundation.
Final Thoughts on Learning Makeup From Scratch
The easiest way to master how to apply makeup step by step from 0 with pictures is to practice one stage at a time. Don’t try to perfect foundation, brows, eyeshadow, eyeliner, contour, and lipstick in one morning. Your hands need repetition just as much as your eyes need practice.
Start with a simple base. Then learn blush, brows, mascara, and lips. After that, explore makeup techniques such as contouring, highlighting, eyeshadow blending, and winged eyeliner. You may eventually enjoy experimenting with photoshoot makeup, bridal makeup, or dramatic evening styles. For now, focus on consistency.
Most importantly, don’t judge your progress against a professional makeup artist’s work. Professionals have years of practice, controlled lighting, specialized tools, and often photography equipment. Your goal is different. You’re learning how to apply makeup in a way that feels comfortable, flattering, and practical for your own life.
Keep your tools clean and use eye cosmetics carefully. FDA advises stopping an eye cosmetic if it causes irritation and avoiding eye makeup when you have an eye infection. UU.S. Food and Drug Administration+1 With patience and a little practice, your complete makeup routine will eventually feel less like a checklist and more like second nature.
The factual safety guidance above is grounded in current U.S. FDA and American Academy of Dermatology guidance, particularly for sunscreen, acne-prone skin, cosmetic hygiene, and eye products.
Meta Description
Learn how to apply makeup step by step with pictures for beginners! Master your face, eyes, and lips with easy tips and techniques.